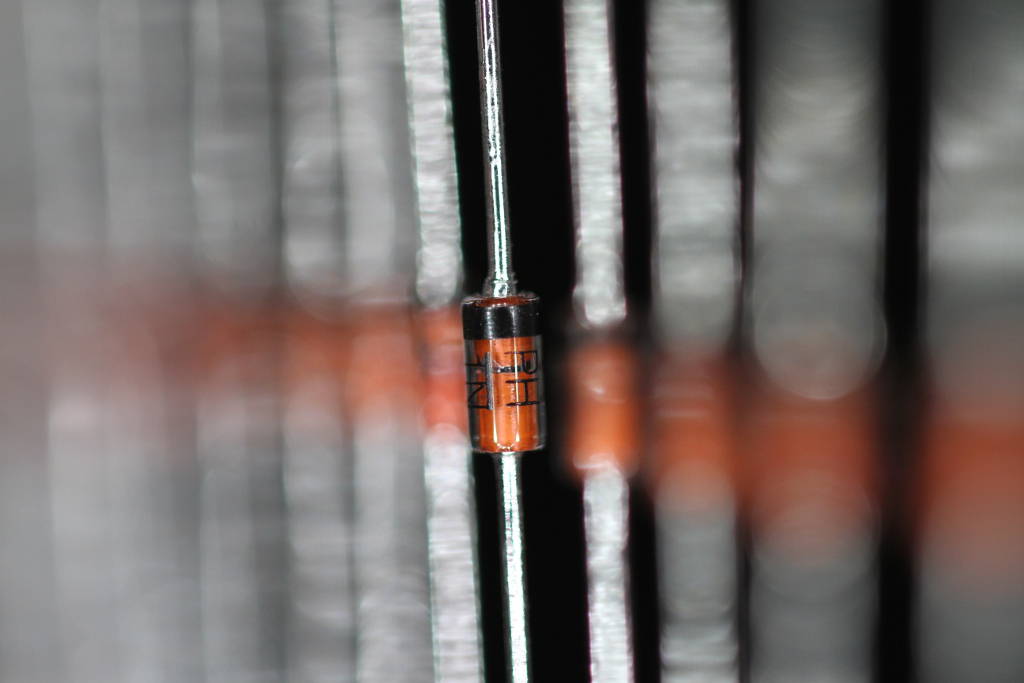
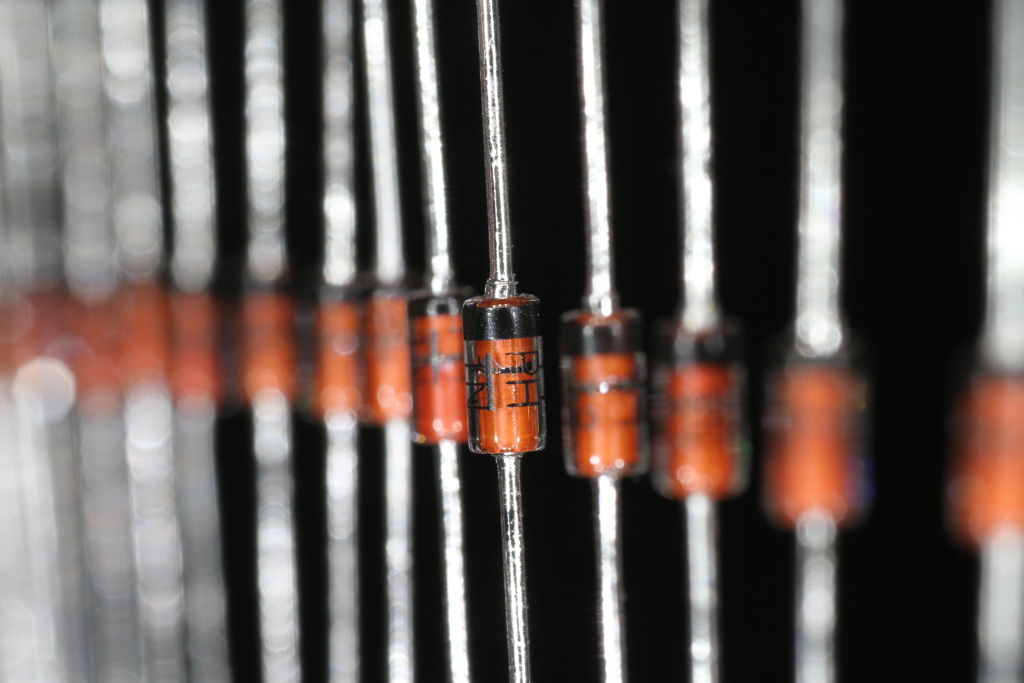
70 mm, f/2.8, 1/800 s, ISO-400
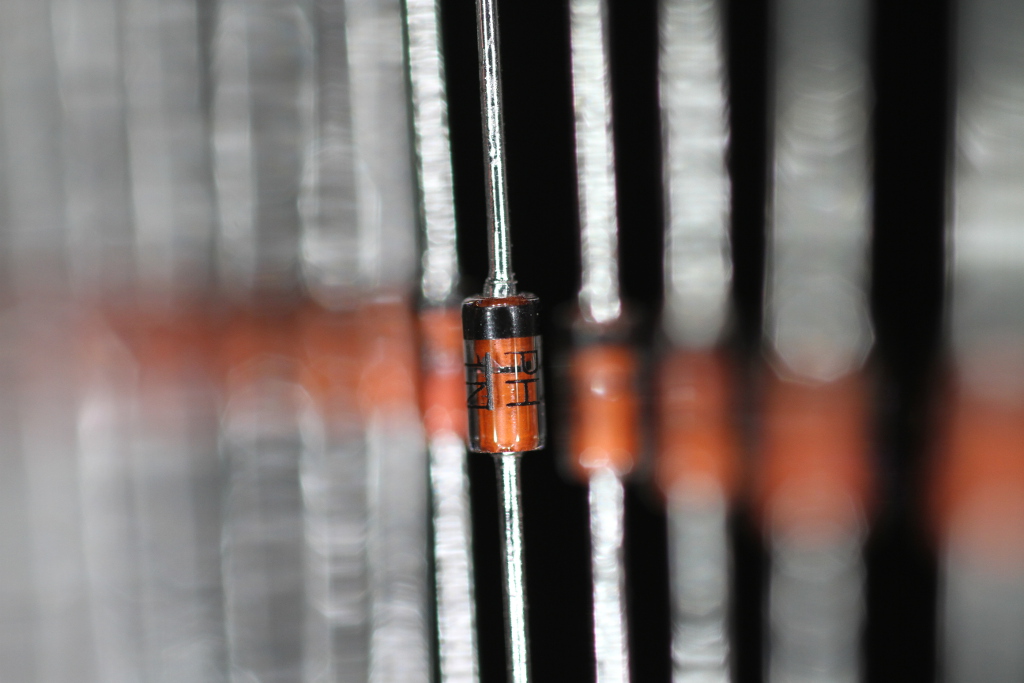
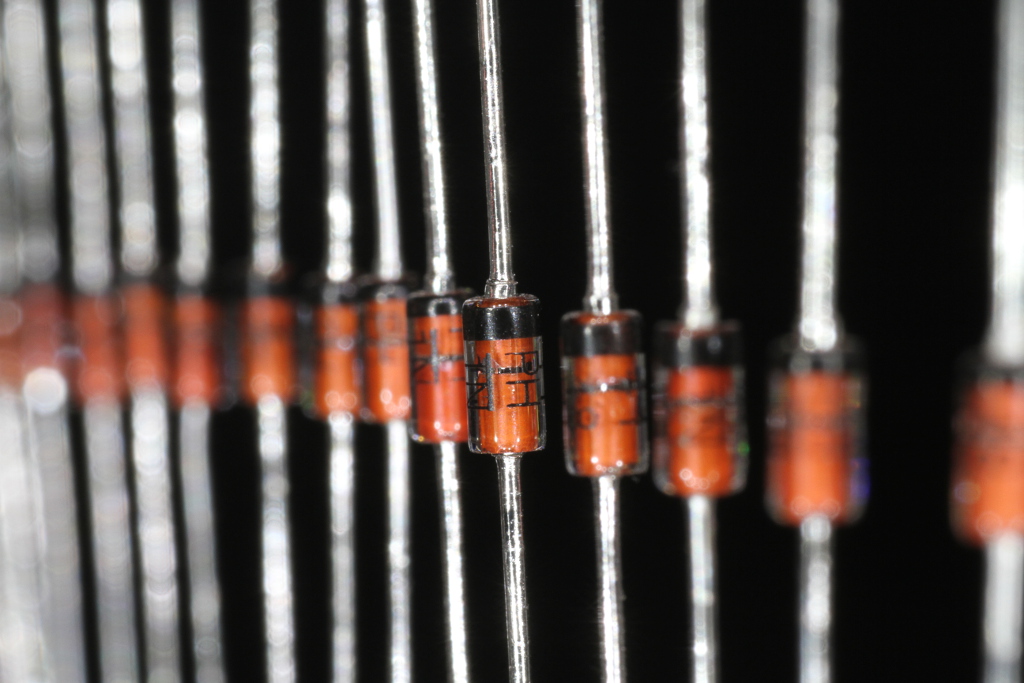
70 mm, f/4, 1/400 s, ISO-400
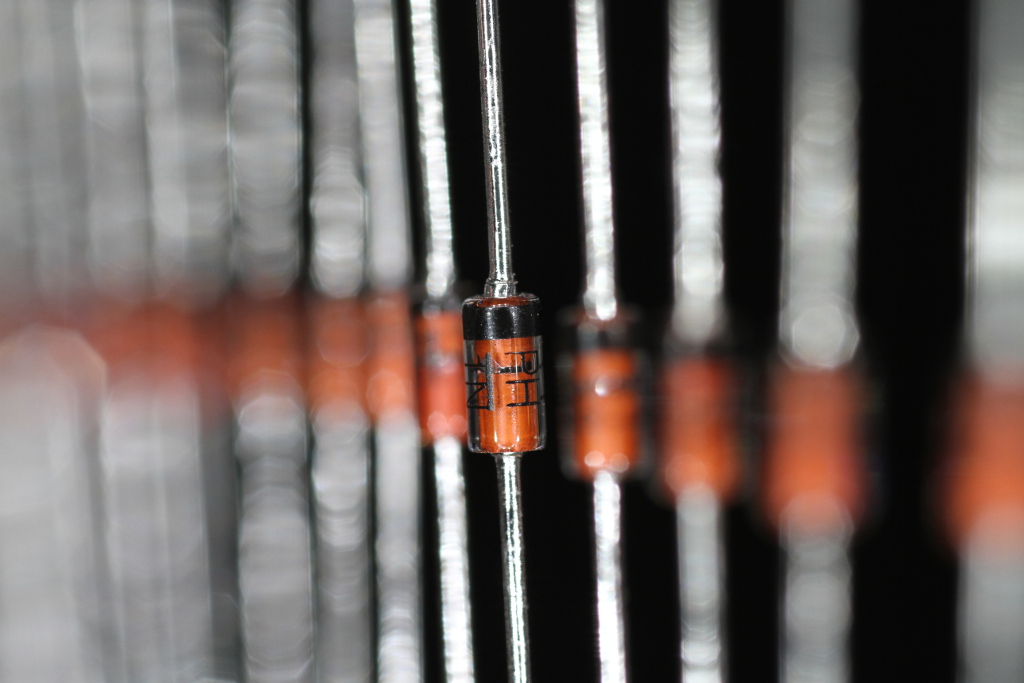
70 mm, f/5.6, 1/200 s, ISO-400
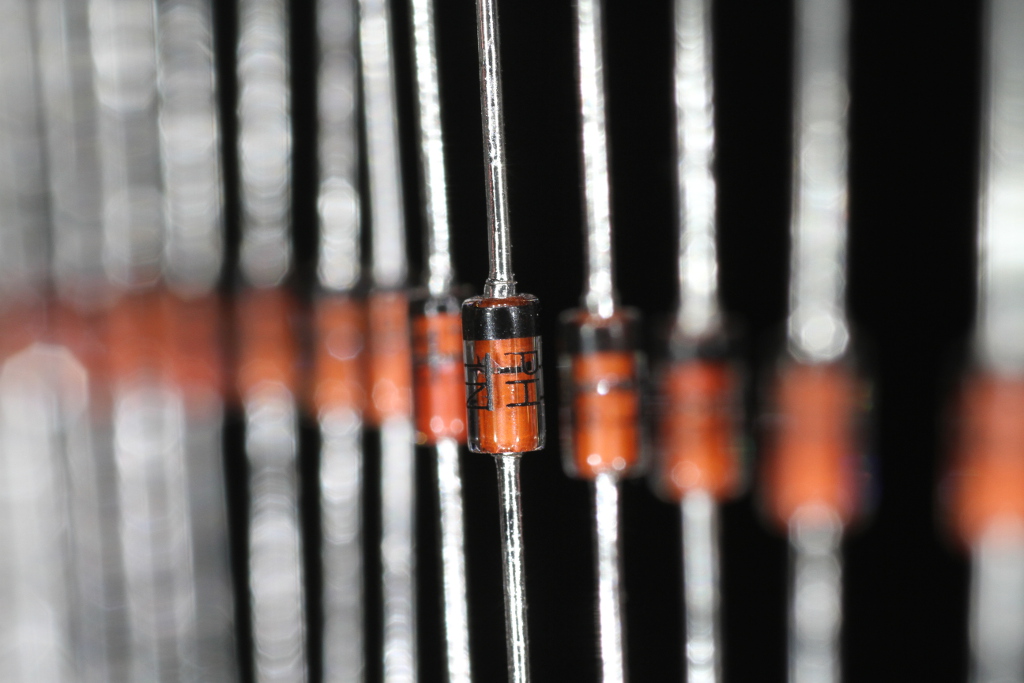
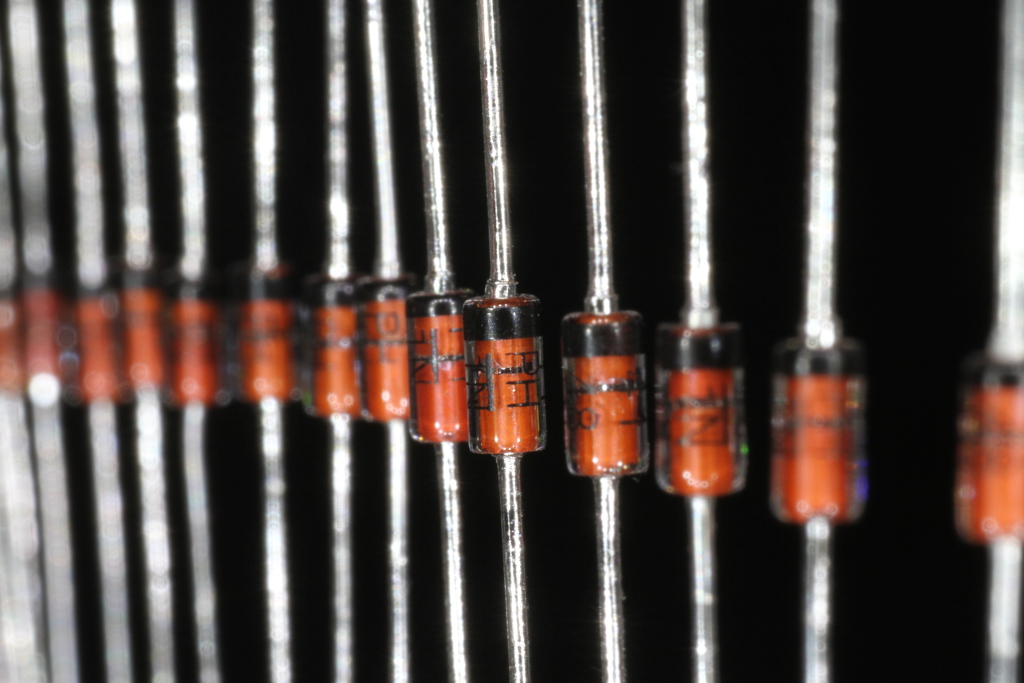
70 mm, f/8, 1/80 s, ISO-400
70 mm, f/11, 1/40 s, ISO-400
70 mm, f/16, 1/20 s, ISO-400
70 mm, f/22, 1/10 s, ISO-400
Depth of field defines the range of distance that appears acceptably sharp on a picture. Playing with the depth of field can be very effective in photography: for example, when taking a portrait, you usually want a very small depth of field to show a sharp face on a blurred background. On the other hand, when shooting a landscape, you'll probably want a very large depth of field, from the closest objects to the very far mountains, everything should be sharp.
Strictly speaking, depth of field is always zero: only the plane at which the lens is focused at appears sharp, all the rest is blurred. But if the blur is not too strong and it's not visible on the final image, some can be accepted. This way, the depth of field deserves all of its meaning, and can easily be calculated.
Three main factors controls the depth of field: lens aperture, overall magnification and acceptable blur.
A perfectly focused point will be imaged as a sharp point, but when slightly out of focus it will become a circle. If this circle is small, it can still be considered a point and the blur will not be (too) visible. The diameter of the largest circle that can still be considered as a sharp point is called circle of confusion c. This diameter, of course, is on the film (or imager), but its choice must take into account the size of the image when it's observed (printed or on a screen), which is usually at a different scale. However, for 35 mm photography, c is usually around 25 μm. Some people choose a smaller value to have larger sharp prints, others accept a less demanding larger circle. Since larger prints are usually observed form a greater distance, 25 μm works ok for the majority of the situations.
This is a good starting point also for digital images. Digital imagers have a well-specified pixel (photosite) size, also called pixel pitch: it's useless to choose a smaller circle of confusion than twice the pixel size, since the imager will not be able to record the extra details. For example, the Canon EOS 7D has a pixel pitch of 4.3 μm (22.3 mm sensor side divided by 5184 pixels): the minimum circle of confusion is 8.6 μm and any smaller value will not bring any additional depth of field. If you wonder why one should double the pixel pitch, it's simply because you need a pixel of different value between two adjacent points to remark that you are imaging two different objects and not a single one.
Depth of field is a geometrical concept and depends also on the size of the aperture of the lens: the wider the aperture, the smaller the depth of field. Aperture is the easiest parameter to change when taking a picture. As a reminder, the aperture is the diameter of the "hole" through which light travels, and is somehow proportional to the diameter of the lens, but can also be easily reduced with the diaphragm.
Unfortunately, there are limits to the aperture: wide open lenses are expensive, bulky and heavy. Even expensive professional lenses do not have apertures wider than f/1 (the smaller the number after f/, the wider the aperture and the smaller the depth of field). The aperture cannot be too little neither, since diffraction will take over and blur the image.
The following pictures are an example of the effect of aperture on the depth of field. Watch how depth of field changes while reducing the aperture from f/2.8 down to f/22 in one stop steps. Of course, smaller apertures let less light through: exposure time must be increased to compensate the lower light and vice versa.
70 mm, f/2.8, 1/800 s, ISO-400 |
70 mm, f/4, 1/400 s, ISO-400 |
70 mm, f/5.6, 1/200 s, ISO-400 |
70 mm, f/8, 1/80 s, ISO-400 |
70 mm, f/11, 1/40 s, ISO-400 |
70 mm, f/16, 1/20 s, ISO-400 |
70 mm, f/22, 1/10 s, ISO-400 |
In these pictures, the magnification is about 1 (the size of the image of the center diode on the camera imager is of the same size as the real diode). High magnifications like this one (yes, 1 is high) are typical of macro photography and depth of field is always quite small.
Magnification has also a big impact on depth of field. You can change magnification by changing the lens (using a different focal length) or by changing the distance to the object by moving closer or farther. Lowering the magnification increases the depth of field.
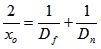
To calculate the depth of field, we have to calculate the hyperfocal distance H first, which is the minimum distance from the front principal plane of the lens that will appear sharp when the lens is focuses at infinity (xo = ∞). The front principal plane is a virtual surface that represents the lens as if it was flat and is the reference plane for all measurements; it's located at focal length distance from the focal point. The following formula will give us H (using the same length units for H, f and c):

Knowing H, we can calculate Dn and Df that are the distances of the nearest (index "n") and farest (index "f") object that will appear sharp on the image. xo is the distance at which the lens is focused. Again, all variables must be expressed in the same length unit.
 ;
;
The depth of field D is just the difference between these two distances:

The maximum possible depth of field is obtained when the lens is focused (about) at the hyperfocal distance H: Df will be ∞ and everything between Dn and ∞ will be sharp.
The following diagram summarizes the different variables used before.
It's interesting to remark that Dn, Df and xo have the following relation between them:
This formula is useful to determine the required aperture N and focus distance xo when only Dn and Df are known.
So, stepping down the diaphragm to reduce the aperture increases the geometrical depth of field, but if the aperture is too small, diffraction spreads out the light adding blur to the image and limiting again the depth of field.
The following equation relates the circle of confusion generated by diffraction c' to the wavelength λ and the aperture N. It's useless to specify a smaller circle of confusion than the one imposed by diffraction, because for a given aperture, no point will be sharper than c'.

Normally, for photography, a wavelength λ = 550 nm is used. This corresponds to a green color and to the maximum sensitivity of the human eye (in photonic vision).
The following calculator will find the depth of field for a given lens and aperture. Just enter f, N, xo, c and λ, then press the calculate button.
If diffraction is limiting, the calculator uses a larger aperture to get the real depth of field. In this case, the aperture field will be smaller than the minimum aperture field and will appear red.
If you don't want to take diffraction into account, just enter a very small wavelength λ, for example 1 nm, and ignore N'.
The following calculator will find the required aperture for a given depth of field and a given lens. Just enter f, Df, Dn, c and λ, then press the calculate button.
If diffraction is limiting, the required aperture field will be larger than the minimum aperture field and will appear red. This means that is not possible to reach the desired depth of field because of diffraction.
The value "Infinity" can be entered for Df, but since it's case sensitive it has to be typed as shown.
If you don't want to take diffraction into account, just enter a very small wavelength λ, for example 1 nm, and ignore N'.
Remark: a large aperture has a small number after f/. So, f/2 is larger than f/4!
| [1] | Warren J. Smith. Modern Optical Engineering - The Design of Optical Systems. 3rd Edition, McGraw-Hill, 2000, section 6.8. |
| [2] | Eugene Hecht. Optics. 4th Edition, Addison Wesley, 2002, sections 5.7.7 and 10.2.5. |
| [3] | Warren J. Smith. Modern Optical Engineering - The Design of Optical Systems. 3rd Edition, McGraw-Hill, 2000, section 6.10. |
| Home | Optics | Page hits: 057145 | Created: 10.2005 | Last update: 08.2014 |